- @RequestParam
- Controller 코드
@Controller
@RequestMapping(value = "/thymeleaf")
//클라이언트의 요청에 대해서 어떤 컨트롤러가 처리할지 매핑하는 어노테이션이다.
//url에 "/thymeleaf" 경로로 오는 요청을 Controller가 처리하도록 한다.
public class ThymeleafExController {

    @GetMapping(value = "/ex01")
    public String thymeleafExample01(@RequestParam(value = "asd") int a, Model model) {
        model.addAttribute("data", "타임리프 예제 입니다.");
        model.addAttribute("a", a);
        return "thymeleafEx/thymeleafEx01";
    }
}
- value의 값에 따라 url 요청 파라미터가 지정된다.
- html 코드
<!DOCTYPE html>
<html xmlns:th="http://www.thymeleaf.org">
<head>
    <meta charset="UTF=8">
    <title>Title</title>
</head>
<body>
<p th:text="${data}">Hello Thymeleaf!!</p>
<p th:text="${a}"}>th:text="${a}"}</p>
</body>
</html>
- url 요청
http://localhost/thymeleaf/ex01?asd=7
- 화면 출력 결과

- Querydsl
- Querydsl을 기존 코드에 연동하기 위해서는 다음과 같은 과정으로 작성해야 한다.
1. Querydsl을 이용할 인터페이스 선언
2. '인터페이스 이름 + Impl'이라는 이름으로 클래스를 선언 - 이때 QuerydslRepositorySupport라는 부모 클래스를 지정하고 인터페이스를 구현
3. 기존의 Repository에는 부모 인터페이스로 Querydsl을 위한 인터페이스를 지정
- thymeleaf
- each 사용
<tr th:each="itemDto, status:${itemDtoList}">

//-----------------------------------------------

<tr th:each="itemDto, ${itemDtoList}">
- status를 사용하게 되면 status.index / status.count와 같이 추가적인 반복문의 상태 정보를 사용할 수 있다.
- controller
 @GetMapping(value = "/ex04")
    public String thymeleafExample04(Model model) {
        List<ItemDto> itemDtoList = new ArrayList<>();

        for (int i = 1; i <= 10; i++) {
            ItemDto itemDto = new ItemDto();
            itemDto.setItemDetail("상품 상세 설명" + i);
            itemDto.setItemNm("테스트 상품" + i);
            itemDto.setPrice(10000 * i);
            itemDto.setRegTime(LocalDateTime.now());

            itemDtoList.add(itemDto);
        }
        model.addAttribute(itemDtoList);
        return "thymeleafEx/thymeleafEx04";
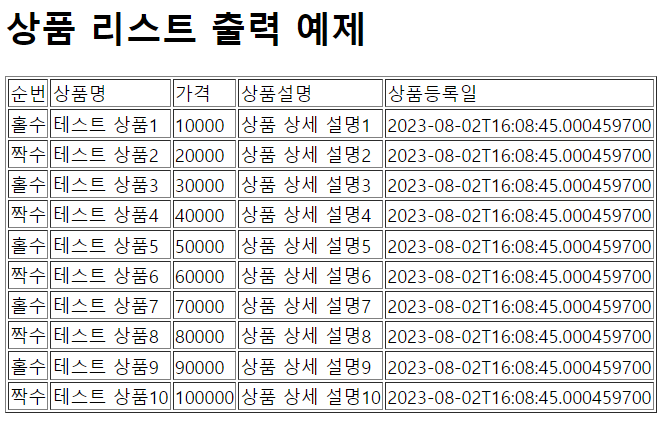
- html
<table border="1">
        <thead>
        <tr>
            <td>순번</td>
            <td>상품명</td>
            <td>가격</td>
            <td>상품설명</td>
            <td>상품등록일</td>
        </tr>
        </thead>
        <tbody>
        <tr th:each="itemDto, status:${itemDtoList}">
<!--            <td th:if="${status.even}" th:text="짝수"></td>-->
<!--            <td th:unless="${status.even}" th:text="홀수"></td>-->
            <td th:switch="${status.even}">
                <span th:case="true">짝수</span>
                <span th:case="false">홀수</span>
            </td>
            <td th:text="${itemDto.itemNm}"></td>
            <td th:text="${itemDto.price}"></td>
            <td th:text="${itemDto.itemDetail}"></td>
            <td th:text="${itemDto.regTime}"></td>
        </tr>
        </tbody>
    </table>
- controller에서 넘어온 itemDtoList를 돌면서 itemDto에 넣어서 데이터를 추출한다.
- if 사용
<td th:if="${status.even}" th:text="짝수"></td>
<td th:unless="${status.even}" th:text="홀수"></td>
- if, unless를 사용하여 status를 이용하여 조건문을 사용할 수 있다.
- switch, case 사용
<td th:switch="${status.even}">
                <span th:case="true">짝수</span>
                <span th:case="false">홀수</span>
            </td>
- if문과 마찬가지로 switch, case를 이용하여 원하는 값을 출력할 수 있다.
- href
- Controller
@GetMapping(value = "/ex05")
    public String thymeleafExample05() {
        return "thymeleafEx/thymeleafEx05";
    }
- Html
<!DOCTYPE html>
<html xmlns:th="http://www.thymeleaf.org">
<head>
<meta charset="UTF=8">
<title>Title</title>
</head>
<body>
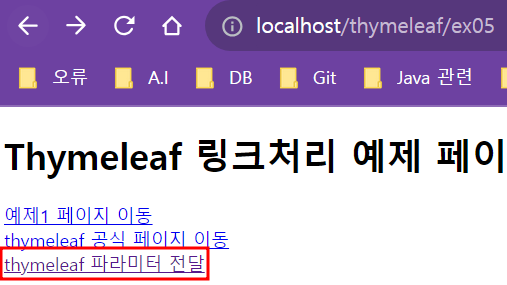
<h1>Thymeleaf 링크처리 예제 페이지</h1>
<div>
<a th:href="@{/thymeleaf/ex01}">예제1 페이지 이동</a>
</div>
<div>
<a th:href="@{https://www.thymeleaf.org/}">thymeleaf 공식 페이지 이동</a>
</div>
<div>
<a th:href="@{/thymeleaf/ex06(param1 = '파라미터 데이터1',
param2 = '파라미터 데이터2')}">thymeleaf 파라미터 전달</a>
</div>
</body>
</html>- th:href="@{경로 작성}" 을 통해 원하는 페이지로 이동이 가능하다.
<a th:href="@{/thymeleaf/ex06(param1 = '파라미터 데이터1',
         param2 = '파라미터 데이터2')}">thymeleaf 파라미터 전달</a>
- 위와 같이 get방식으로 파라미터를 넘길 수 있다.
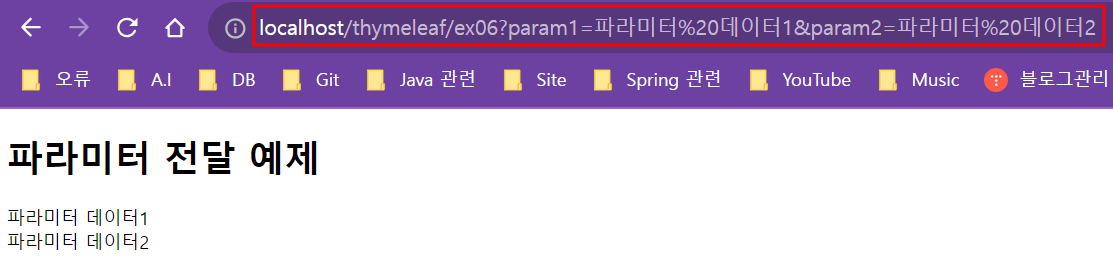
- 위와 같이 get 방식을 통해 넘어온 param1, param2 데이터는
@GetMapping(value = "/ex06")
    public String thymeleafExample06(String param1, String param2, Model model) {
        model.addAttribute("param1", param1);
        model.addAttribute("param2", param2);
        return "thymeleafEx/thymeleafEx06";
    }
- 위와 같이 변수로 받아서 넘길 수 있다. 넘어온 파라미터의 값은 model에 담아 view에 전달한다.
- fragment, layout
- 오류 발생 : footer와 header가 출력되지 않음
-> xml에서 버전 3.1.0으로 업데이트 이후 정상 실행
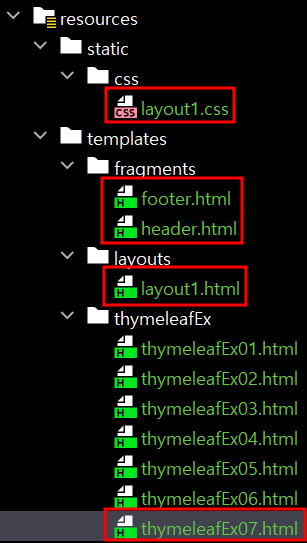
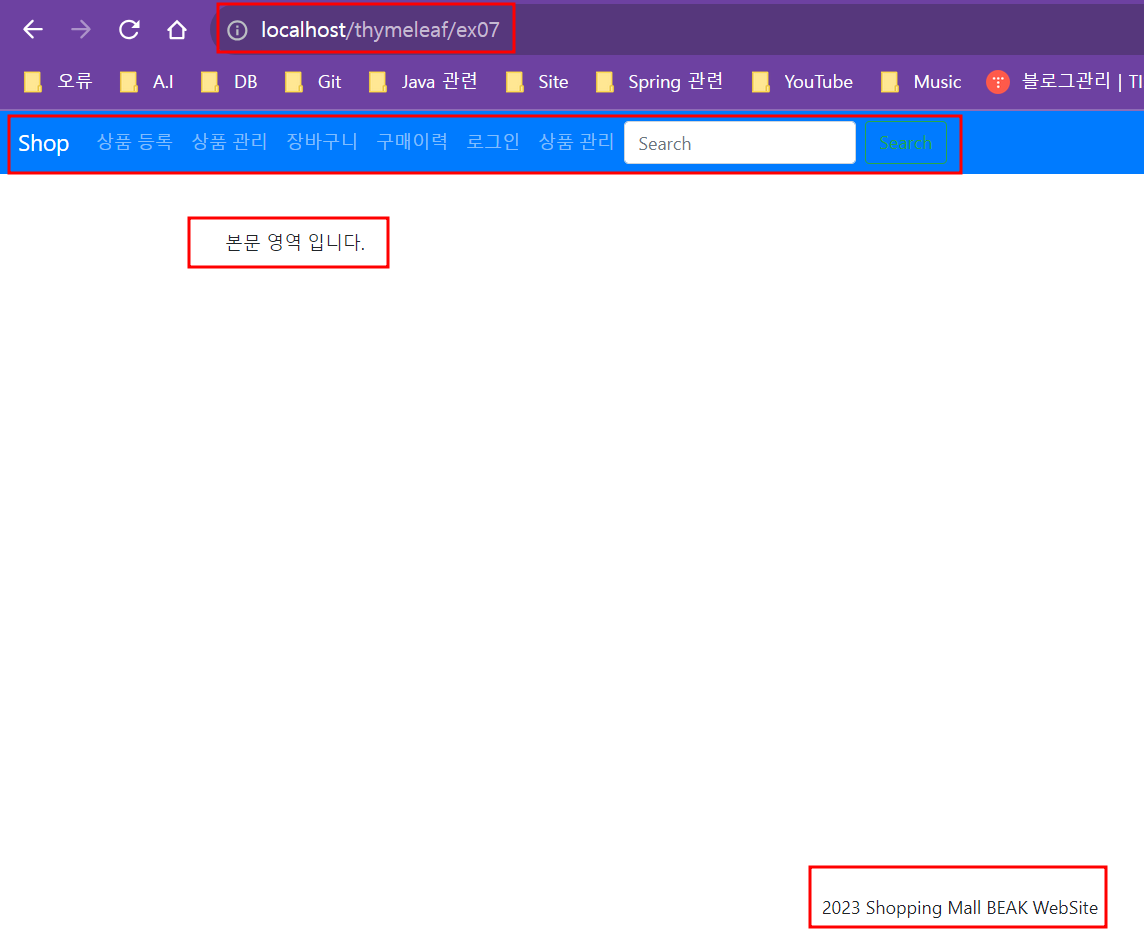
- thymeleafEx07.html
<!DOCTYPE html>
<html xmlns:th="http://www.thymeleaf.org"
      xmlns:layout=http://www.ultraq.net.nz/thymeleaf/layout
      layout:decorate="~{layouts/layout1}">
// layout1.html 파일을 레이아웃으로 사용하겠다는 의미입니다.
// 이를 통해 layout1.html 파일의 레이아웃이 적용됩니다.
<div layout:fragment="content">
    본문 영역 입니다.
</div>
//현재 fragment="content"에 아무 값도 없기 때문에 "본문 영역 입니다." 만 화면에 출력된다.

</html>
- layout1.html
<!DOCTYPE html>
<html xmlns:th="http://www.thymeleaf.org"
        xmlns:layout="http://www.ultraq.net.nz/thymeleaf/layout">
<head>
    <meta charset="UTF-8">
    <title>Title</title>

    <!-- CSS only -->
    <link rel="stylesheet" href="https://stackpath.bootstrapcdn.com/bootstrap/4.5.2/css/bootstrap.min.css">
    <link th:href="@{/css/layout1.css}" rel="stylesheet">
    // CSS에 관한 코드 작성
    // th:href="@{/css/layout1.css}" 이 부분을 통해 해당 경로의 css 파일을 가져오겠다는 의미이다.

    <!-- JS, Popper.js, and jQuery -->
    <script src="https://code.jquery.com/jquery-3.5.1.min.js"></script>
    <script src="https://cdn.jsdelivr.net/npm/popper.js@1.16.1/dist/umd/popper.min.js"></script>
    <script src="https://stackpath.bootstrapcdn.com/bootstrap/4.5.2/js/bootstrap.min.js"></script>
	//bootStrap을 이용하기 위한 코드

</head>
<body>
<div th:replace="fragments/header::header"></div>
//fragments 경로에 있는 header.html의 header를 사용하는 부분이다.
<div layout:fragment="content" class="content">
//css 파일에 있는 .content 클래스를 사용하는 부분이다.
</div>
<div th:replace="fragments/footer::footer"></div>
//fragments 경로에 있는 footer.html의 footer 사용하는 부분이다.
</body>
</html>
- header.html
<!DOCTYPE html>
<html xmlns:th="http://www.thymeleaf.org">

    <div th:fragment="header">
        <nav class="navbar navbar-expand-sm bg-primary navbar-dark">
            <button class="navbar-toggler" type="button" data-toggle="collapse"
                    data-target="#navbarTogglerDemo03" aria-controls="navbarTogglerDemo03"
                    aria-expanded="false" aria-label="Toggle navigation">
                <span class="navbar-toggler-icon"></span>
            </button>

            <a class="navbar-brand" href="/">Shop</a>

            <div class="collapse navbar-collapse" id="navbarSupportedContent">
                <ul class="navbar-nav me-auto mb-2 mb-lg-0">
                    <li class="nav-item">
                        <a class="nav-link" href="/admin/item/new">상품 등록</a>
                    </li>
                    <li class="nav-item">
                        <a class="nav-link" href="/admin/items">상품 관리</a>
                    </li>
                    <li class="nav-item">
                        <a class="nav-link" href="/cart">장바구니</a>
                    </li>
                    <li class="nav-item">
                        <a class="nav-link" href="/orders">구매이력</a>
                    </li>
                    <li class="nav-item">
                        <a class="nav-link" href="/members/login">로그인</a>
                    </li>
                    <li class="nav-item">
                        <a class="nav-link" href="/members/logout">상품 관리</a>
                    </li>
                </ul>
                <form class="form-inline my-2 my-lg-0" th:action="@{/}" method="get">
                    <input name = "searchQuery" class="form-control mr-sm-2"
                           type="search" placeholder="Search" aria-label="Search">
                    <button class="btn btn-outline-success my-2 my-sm-0"
                            type="submit">Search</button>
                </form>
            </div>
        </nav>
    </div>

</html>
- bootstrap에 있는 코드를 빌려 화면에 출력되는 코드를 작성해준다.
- footer.html
<!DOCTYPE html>
<html xmlns:th="http://www.thymeleaf.org">
<div class="footer" th:fragment="footer">
    <footer class="page-footer font-small cyan darken-3">
        <div class="footer-copyright text-center py-3">
            2023 Shopping Mall BEAK WebSite
        </div>
    </footer>
</div>
</html>
- <footer>는 HTML 요소 중 하나로, 웹 페이지의 하단에 위차하여 주로 사이트의 정보나 저작권 정보 등을 표시하는 부분을 나타낸다.
- layout1.css
html {
    position: relative;
    min-height: 100%;
    margin: 0;
}
body {
    min-height: 100%;
}
.footer {
    position: absolute;
    left: 0;
    right: 0;
    bottom: 0;
    width: 100%;
    padding: 15px 0;
    text-align: center;
}
.content{
    margin-bottom:100px;
    margin-top: 50px;
    margin-left: 200px;
    margin-right: 200px;
}
<div layout:fragment="content" class="content">
//css 파일에 있는 .content 클래스를 사용하는 부분이다.<div class="footer" th:fragment="footer">- 위의 코드처럼 class="content" / class="footer" 해당 클래스들이 css 파일에 .content / .footer와 같이 클래스가 정의되어 있으면 Thymeleaf 템플릿 엔진은 해당 클래스를 클라이언트에게 포함시킨다.
@GetMapping(value = "/ex07")
    public String thymeleafExample07() {
        return "thymeleafEx/thymeleafEx07";
    }
<!DOCTYPE html>
<html xmlns:th="http://www.thymeleaf.org"
xmlns:layout=http://www.ultraq.net.nz/thymeleaf/layout
layout:decorate="~{layouts/layout1}">
// layout1.html 파일을 레이아웃으로 사용하겠다는 의미입니다.
// 이를 통해 layout1.html 파일의 레이아웃이 적용됩니다.
<div layout:fragment="content">
본문 영역 입니다.
</div>
//현재 fragment="content"에 아무 값도 없기 때문에 "본문 영역 입니다." 만 화면에 출력된다.
</html>- <div layout:fragment="content">는 실제로 "본문 영역 입니다."라는 텍스트를 가지고 있으며, 이 부분이 'layouts/layout1.html'의 'content' 레이아웃(fragment)를 참조하여 출력된다.
- 즉, layout1.html의 'layout:fragment="content"에 해당하는 내용은 출력되지 않고, thymeleafEx07.html의 <div layout:fragment="content">에 해당하는 내용만 'layouts/layout1.html'의 'content' 레이아웃(fragment)를 참조하여 출력된다.
'Portfolio, Project > Project(Programming)' 카테고리의 다른 글
| Project (5-1) 상품 등록 및 수정 (2) (0) | 2023.08.09 |
|---|---|
| Project (5-1) - 상품 등록 및 수정 (1) (0) | 2023.08.08 |
| Project - (4) 연관관계 매핑 (0) | 2023.08.07 |
| Project (3) - 스프링 시큐리티 (0) | 2023.08.03 |
| Project - (1) Spring Data JPA (0) | 2023.08.01 |