https://insoobaik.tistory.com/517
Vue, Spring - 간단한 블로그 만들기 - 1 (Vue 설정)
- 실행 구조 1. Spring Boot - Spring Boot는 내장된 웹 서버(Tomcat 등)을 사용하여 백엔드 서버를 실행한다. - 애플리케이션을 실행하려면 Java 개발 환경을 설정하고, 해당 애플리케이션을 빌드하여 실행
insoobaik.tistory.com
- 이전 Vue의 기본적인 설정들을 마치고, views 페이지들을 생성하고, 이전에 만들어둔 Spring 서버로 요청하고 응답을 받아 볼 것이다.
| path | / | /write | /read/:postId | /edit/:postId |
| component | HomeView | WriteView | ReadView | EditView |
- 각 경로와 component는 위와 같다.
- HomeView.vue
const router = useRouter()

const posts = ref([]);

axios.get("/api/posts?page=1&size=5").then(response=>{
  response.data.forEach((r:any)=>{
    // 반응형이 아니기 data / value와 같이 설정을 해주지 않으면 데이터가 화면에 보이지 않는다.
    posts.value.push(r);
  })
});

</script>

<template>
  <ul>
    <li v-for="post in posts" :key="post.id">
      <div class="title">
        <router-link :to="{name:'read',params:{postId:post.id}}">{{post.title}}</router-link>
      </div>

      <div class="content">
        {{post.content}}
      </div>

    </li>
  </ul>
</template>
1. useRouter()를 통해 Vue Router 인스턴스를 사용할 수 있도록 한다.
2. 반응형 배열인 posts를 생성한다.
3. axios를 통해 get 요청을 해당 url로 보낸다. "/api/posts/~~~ 의 경로는 view.config.ts 파일에서 설정한 코드에 따라 백엔드 서버로 프록시에 의해 전달된다.
3.1 즉, [백엔드 서버/posts?page=1&size=5] 의 주소로 요청을 보내고 .then을 통해 요청에 대한 응답을 용도에 맞게 코딩한다.
4. 응답받은 객체 배열을 forEach로 돌면서 각 객체 배열의 각 객체를 posts 배열에 push를 통해 배열을 주입하고, 새로운 객체 배열 posts를 생성한다.
5. <template> 부분의 <ul> <li>를 통해 리스트를 생성하고, 위에서 생성한 객체배열 posts를 통해 배열을 순회한다
6. router-link를 통해 각 객체에 대해 index.ts에 설정한 route 경로를 작성하여 해당 경로로 이동할 수 있도록 설정한다.
6.1 HomeView에서는 router를 통해 read 컴포넌트를 사용하고 있고

ReadView의 경우 경로에 쿼리 파라미터를 전달하고 있기 때문에 [params:]를 통해 쿼리 파라미터에 값을 넣어 전달한다.
- 글 읽기, 수정, 삭제
- ReadView.vue
<script setup lang="ts">
import {onMounted, ref} from "vue";
import axios from "axios";
import router from "@/router";

const props = defineProps({
  postId:{
    type:[Number, String],
    required:true,
  }
})

const post=ref({
  id:0,
  title:"",
  content:"",
})

const moveToEdit=()=>{
  router.push({name:"edit", params: {postId:props.postId}})
}

onMounted(()=>{
  axios.get(`/api/posts/${props.postId}`).then(response=>{
    console.log(response)
    post.value=response.data;
  });
})

const toDelete=() =>{
  axios.delete(`/api/posts/${props.postId}`).then(()=>{
    router.replace({name:"home"})
  });
}

</script>
<template>
  <el-row>
    <el-col>
      <h2 class="title">{{ post.title }}</h2>
      <div class="sub d-flex">
        <div class="category">개발</div>
        <div class="regdate">2023.09.26</div>
      </div>
    </el-col>
  </el-row>

  <el-row class="mt-3">
    <el-col>
      <div class="content">{{post.content}}</div>
    </el-col>
  </el-row>

  <el-row class="mt-3">
    <el-col>
      <div class="d-flex justify-content-end">
        <el-button type="warning" @click="moveToEdit()">수정</el-button>
        <el-button type="danger" @click="toDelete()">삭제</el-button>
      </div>
    </el-col>
  </el-row>
</template>
const props = defineProps({
postId:{
type:[Number, String],
required:true,
}
})- defineProps 함수는 부모 컴포넌트로부터 자식 컴포넌트로 데이터를 전달할 때 사용된다. 자식 컴포넌트에서 this.postId와 같은 방식으로 접근할 수 있고, 부모 컴포넌트에서 전달된 값에 대한 유효성 검사 및 타입 체크르르 수행할 수 있다.
const post=ref({
  id:0,
  title:"",
  content:"",
})
- post는 반응형 객체로 id : 0, 빈 title과 content를 생성한다.
const moveToEdit=()=>{
  router.push({name:"edit", params: {postId:props.postId}})
}

onMounted(()=>{
  axios.get(`/api/posts/${props.postId}`).then(response=>{
    console.log(response)
    post.value=response.data;
  });
})

const toDelete=() =>{
  axios.delete(`/api/posts/${props.postId}`).then(()=>{
    router.replace({name:"home"})
  });
}
1. router.push : 페이지를 전환하고, URL을 변경하는 데 사용된다. 기존 페이지의 기록이 스택에 남아있어 뒤로 가기 버튼을 사용하여 이전 페이지로 이동 할 수 있다.
2. router.replace : 페이지를 전환하고, URL을 변경하는 데 사용된다. push와 달리 기존 페이지의 기록이 스택에 남지 않고, 새로운 페이지로 이동한다.
3. moveToEdit은 router.push를 이용하여 router에서 생성한 경로인 edit 경로로 이동하도록 만들고, 요청 파라미터는 postId로 지정하며 위에서 생성한 props의 postId를 지정함으로서 Number, String만 받을 수 있다.
4. onMounted는 라이프사이클 훅 중 하나인 onMounted를 사용하여 비동기 작업을 수행하는 코드이다. Vue 컴포넌트가 DOM에 마운트된 후에 실행되는 함수를 정의할 때 사용된다.
5. axios를 이용하여 해당 url에 get 요청을 보내고 응답 데이터를 기존에 생성해놓은 post 객체에 value로 response.data로 받아서 값을 변경한다.
6. toDelete 함수도 마찬가지로 axios를 이용하여 해당 url에 delete요청을 보내고 요청을 보낸 뒤 router를 통해 path name이 home인 곳으로 페이지를 이동 시킨다.
<template>
  <el-row>
    <el-col>
      <h2 class="title">{{ post.title }}</h2>
      <div class="sub d-flex">
        <div class="category">개발</div>
        <div class="regdate">2023.09.26</div>
      </div>
    </el-col>
  </el-row>

  <el-row class="mt-3">
    <el-col>
      <div class="content">{{post.content}}</div>
    </el-col>
  </el-row>

  <el-row class="mt-3">
    <el-col>
      <div class="d-flex justify-content-end">
        <el-button type="warning" @click="moveToEdit()">수정</el-button>
        <el-button type="danger" @click="toDelete()">삭제</el-button>
      </div>
    </el-col>
  </el-row>
</template>
- 위의 <template> 코드는 작성된 글을 클릭 했을 때 onMounted에 의해 get 요청이 호출되고 전달받은 응답 데이터를 바탕으로 해당 페이지를 구성하게 된다.
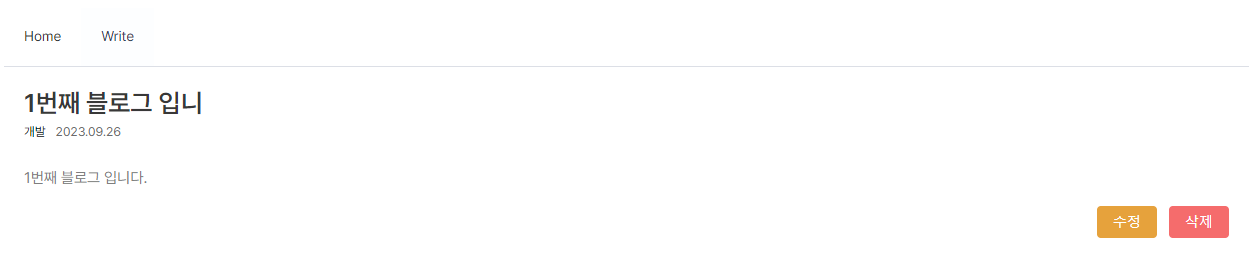
- title, content가 위와 같이 보이게 되고, 우측에 moveToEdit(), toDelete() 함수를 실행 시킬 버튼이 생성된 것을 확인 할 수 있다.
- 백엔드와 통신
- 위에 get 요청을 통해
axios.get(`/api/posts/${props.postId}`)위의 경로로 get 요청을 보내는 것을 알 수 있다.
server: {
    proxy: {
      // "/posts": "http://localhost:8080 ",
      "/api":{
        target : "http://localhost:8080",
        rewrite:(path)=>path.replace(/^\/api/,""),
      }
    }
  }
이전에 vite.config.ts에서 작성한 server: proxy에 의해 /api/posts...로 요청이 전달되면, /api를 제외한 /posts...의 요청이 백엔드 서버에 해당하는 http://localhost:8080으로 전달되게 된다.
- 즉, 결과적으로 위의 요청은 http://localhost:8080/posts/1 과 같이 백엔드 서버에 요청이 전달되는 것이다.
- 백엔드 서버 코드
@GetMapping("/posts/{postId}")
    public PostResponse get(@PathVariable Long postId) {
        return postService.get(postId);
    }
1. Spring 백엔드 서버의 controller를 보게되면, /posts/{postId}로 요청이 오게 되면 postService의 get메서드를 호출하게 된다.
public PostResponse get(Long postId) {
        Post post = postRepository.findById(postId)
//                .orElseThrow(() -> new IllegalArgumentException("존재하지 않는 글 입니다."));
                .orElseThrow(PostNotFound::new);
        // 나중에 메시지를 검증 할 필요가 없다.
//        최초에 Optional을 감싸서 반환한다 -> 값이 없을 경우 null을 반환하기 때문이다.
//        글이 없으면 없다는 적당한 에러를 만드는 것이 좋다.

        return PostResponse.builder()
                .id(post.getId())
                .title(post.getTitle())
                .content(post.getContent())
                .build();
    }
2. get 메서드의 경우 postRepository를 통해 해당 postId에 해당하는 데이터를 찾아 DTO에 해당하는 PostResponse에 값을 넣어 원하는 데이터만 전달 할 수 있도록 한다.
3. builder 패턴을 이용하여 PostId의 id, title, content를 전달받은 새로운 객체를 생성하고 반환한다.
4. PostResponse 즉, DTO 객체로 전달받은 값을 응답 데이터로 보내고 해당 응답 데이터로 전달된다.
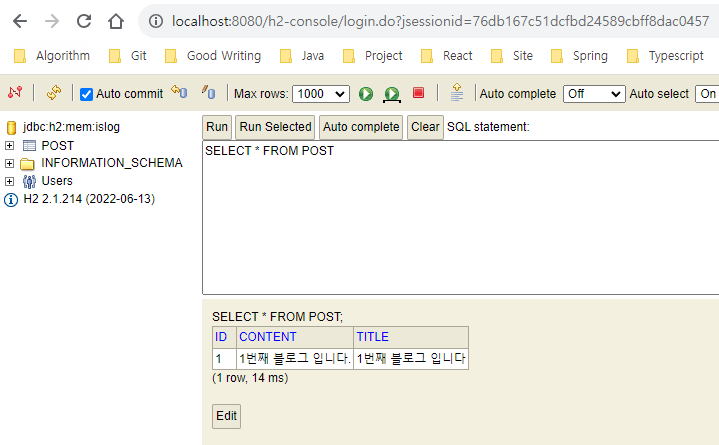

- 현재 DB에 저장된 데이터가 프론트엔드까지 전달되어 화면에 데이터를 띄운 것을 알 수 있다.
'Portfolio, Project > Project(Programming)' 카테고리의 다른 글
| Project - 돈 갚아라 ( 문제 해결 / TMP) (2) | 2023.11.24 |
|---|---|
| Vue, Spring - 간단한 블로그 만들기 - 2 (글 작성, 글 수정 (1차 마무리)) (1) | 2023.10.03 |
| Vue, Spring - 간단한 블로그 만들기 - 1 (Vue 설정) (0) | 2023.09.30 |
| React - 페이지 구현(2) 글 작성 및 수정 (1) | 2023.09.28 |
| React - 페이지 구현(1) (최상위 컴포넌트 (App.js), Home 페이지 작성) (0) | 2023.09.25 |