- Spring은 MultipartFile이라는 인터페이스로 멀티파트 파일을 매우 편리하게 지원한다.
- 일반적인 파일 업로드 방법
- 아래 파일 업로드 방법은 가장 기본적인 방법이다. input을 통해 전달받은 file을 파일명 그대로 지정된 위치에 파일을 저장하는 방식이다.
- upload-form.html
<!DOCTYPE HTML>
<html xmlns:th="http://www.thymeleaf.org">
<head>
    <meta charset="utf-8">
</head>
<body>
<div class="container">
    <div class="py-5 text-center">
        <h2>상품 등록 폼</h2>
    </div>
    <h4 class="mb-3">상품 입력</h4>
    <form th:action method="post" enctype="multipart/form-data">
        <ul>
            <li>상품명 <input type="text" name="itemName"></li>
            <li>파일<input type="file" name="file" ></li>
        </ul>
        <input type="submit"/>
    </form>
</div> <!-- /container -->
</body>
</html>
1. HTML에서 파일을 전송할 때 form에 enctype="multipart/form-data"를 추가해준다
. 그 이유는 첨부파일의 경우 문자가 아닌 바이너리로 전송해야 하기 때문이다.
2. HTML input의 속성을 file로 지정하게 되면 첨부파일을 추가할 수 있게된다.
- SpringUploadController.java
@Slf4j
@Controller
@RequestMapping("/spring")
public class SpringUploadController {

    @Value("${file.dir}")
    private String fileDir;

    @GetMapping("/upload")
    public String newFile() {
        return "upload-form";
    }

    @PostMapping("/upload")
    public String saveFile(@RequestParam String itemName,
                           @RequestParam MultipartFile file, HttpServletRequest request) throws IOException {
        log.info("request={}", request);
        log.info("itemName={}", itemName);
        log.info("multipartFile={}", file);

        if (!file.isEmpty()) {
            String fullPath = fileDir + file.getOriginalFilename();
            log.info("파일 저장 fullPath={}", fullPath);
            file.transferTo(new File(fullPath));
        }

        return "upload-form";
    }
}
@Value("${file.dir}")
private String fileDir;1. @Value는 application.properties의 file.dir 값을 참고한다.
2. 위 값은 파일을 저장할 위치를 지정한다.
@PostMapping("/upload")
public String saveFile(@RequestParam String itemName,
@RequestParam MultipartFile file, HttpServletRequest request) throws IOException {
log.info("request={}", request);
log.info("itemName={}", itemName);
log.info("multipartFile={}", file);
if (!file.isEmpty()) {
String fullPath = fileDir + file.getOriginalFilename();
log.info("파일 저장 fullPath={}", fullPath);
file.transferTo(new File(fullPath));
}
return "upload-form";
}3. HTML에서 넘어온 itemName과 file은 각 클래스에 매핑되어 전달된다.
4. file에 전달되는 값이 비어있지 않으면,
4.1 파일을 저장할 경로와, 파일명을 합쳐서 최종적으로 저장될 경로와 파일명을 생성한다.
4.2 MultipartFile의 transferTo 메서드를 사용하여 실제 저장위치에 해당 파일을 저장한다.
- 실무에서 사용하는 파일 업로드 방법
- ItemForm.java
@Data
public class ItemForm {
private Long itemId;
private String itemName;
private MultipartFile attachFile;
private List<MultipartFile> imageFiles;
}1. 위 엔티티는 HTTP로 전달받은 id, itemName(파일 이름), attachFile(단일 파일), imageFiles(여러가지 파일들)을 담아 전달하기 위한 DTO에 해당한다.
- ItemController.java
@GetMapping("/items/new")
public String newItem(@ModelAttribute ItemForm form) {
return "item-form";
}
@PostMapping("/items/new")
public String saveItem(@ModelAttribute ItemForm form, RedirectAttributes
redirectAttributes) throws IOException {
UploadFile attachFile = fileStore.storeFile(form.getAttachFile());
List<UploadFile> storeImageFiles = fileStore.storeFiles(form.getImageFiles());
//데이터베이스에 저장
Item item = new Item();
item.setItemName(form.getItemName());
item.setAttachFile(attachFile);
item.setImageFiles(storeImageFiles);
itemRepository.save(item);
redirectAttributes.addAttribute("itemId", item.getId());
return "redirect:/items/{itemId}";
}
@GetMapping("/items/{id}")
public String items(@PathVariable Long id, Model model) {
Item item = itemRepository.findById(id);
model.addAttribute("item", item);
return "item-view";
}1. /items/new는 첨부 파일을 등록 할 수 있는 form을 제공한다.

- Item-form.html
<form th:action method="post" enctype="multipart/form-data">
<ul>
<li>상품명 <input type="text" name="itemName"></li>
<li>첨부파일<input type="file" name="attachFile" ></li>
<li>이미지 파일들<input type="file" multiple="multiple" name="imageFiles" ></li>
</ul>
<input type="submit"/>
</form>1. enctype="multipart/form-data를 이용하여 바이너리 데이터를 넘길 수 있도록 한다.
2. name="attachFile"은 파일 하나를 첨부할 수 있다.
3. name="imageFiles"는 파일 여러개를 첨부하기 위해 multiple이라는 속성을 추가해준다.
- ItemController.java
@PostMapping("/items/new")
public String saveItem(@ModelAttribute ItemForm form, RedirectAttributes
redirectAttributes) throws IOException {
UploadFile attachFile = fileStore.storeFile(form.getAttachFile());
List<UploadFile> storeImageFiles = fileStore.storeFiles(form.getImageFiles());
//데이터베이스에 저장
Item item = new Item();
item.setItemName(form.getItemName());
item.setAttachFile(attachFile);
item.setImageFiles(storeImageFiles);
itemRepository.save(item);
redirectAttributes.addAttribute("itemId", item.getId());
return "redirect:/items/{itemId}";
}1. HTML form의 Input을 통해 전달된 첨부파일들이 POST로 /items/new로 전달된다.
2. @ModelAttribute에 의해 ItemForm 클래스에 매핑되고, FileStore(파일 저장 Service) 클래스의 storeFile(단일 파일 저장하는 메서드)와 storeFiles(여러개의 첨부파일을 저장하는 메서드)에 의해 파일이 저장된다.
3. storeFiles, storeFile은 실제 서버 경로에 첨부 파일들을 저장하게 된다. (storeFiles, storeFile 메서드는 아래 알아 볼 것이다.)
4. 실제경로에 저장한 뒤 해당 Upload 파일의 정보들은 Item 클래스에 저장되어 DB에 저장된다.
@Component
public class FileStore {
@Value("${file.dir}")
private String fileDir;
public String getFullPath(String filename) {
return fileDir + filename;
}
public List<UploadFile> storeFiles(List<MultipartFile> multipartFiles) throws IOException {
List<UploadFile> storeFileResult = new ArrayList<>();
for (MultipartFile multipartFile : multipartFiles) {
if (!multipartFiles.isEmpty()) {
UploadFile uploadFile = storeFile(multipartFile);
storeFileResult.add(uploadFile);
}
}
return storeFileResult;
}
public UploadFile storeFile(MultipartFile multipartFile) throws IOException {
if (multipartFile.isEmpty()) {
return null;
}
String originalFilename = multipartFile.getOriginalFilename();
String storeFileName = createStoreFileName(originalFilename);
multipartFile.transferTo(new File((getFullPath(storeFileName))));
return new UploadFile(originalFilename, storeFileName);
}
private String createStoreFileName(String originalFilename) {
String uuid = UUID.randomUUID().toString();
String ext = extractExt(originalFilename);
return uuid + "." + ext;
}
private String extractExt(String originalFilename) {
int pos = originalFilename.lastIndexOf(".");
return originalFilename.substring(pos + 1);
}
}1. storeFile(단일 파일 저장) 메서드가 호출되면, 우선 해당 MultipartFile 유무를 판단한다.
2. 파일명을 그대로 올리게 되면, 저장 경로에 파일명이 중복될 수 있기 때문에 고유한 이름으로 파일명을 지정하여 저장하는 것이 좋다.
3. createStoreFileName이라는 메서드를 생성하여, multipartFile에서 추출한 첨부 파일의 originalFilename()을 가지고, UUID와 파일 확장자를 연결시켜 새로운 파일명을 생성해준다.
4. 새롭게 생성한 파일명을 가지고 받아온 multiparFile을 transferTo 메서드를 이용하여 지정한 경로에 파일을 저장한다.
5. 마지막으로 OriginalFilename(클라이언트에게 보여줄 때는 원본 파일 이미지를 보여줘야 하기 때문에 필요), 와 storeFileName(DB에 저장된 파일을 비교하여 찾기 위해)를 파라미터로 넘기는 UploadFile 객체를 생성해준다.
- ItemController.java
@PostMapping("/items/new")
    public String saveItem(@ModelAttribute ItemForm form, RedirectAttributes
            redirectAttributes) throws IOException {
        UploadFile attachFile = fileStore.storeFile(form.getAttachFile());
        List<UploadFile> storeImageFiles = fileStore.storeFiles(form.getImageFiles());
        //데이터베이스에 저장
        Item item = new Item();
        item.setItemName(form.getItemName());
        item.setAttachFile(attachFile);
        item.setImageFiles(storeImageFiles);
        itemRepository.save(item);
        redirectAttributes.addAttribute("itemId", item.getId());
        return "redirect:/items/{itemId}";
    }
1. 다시 Controller로 돌아가서 fileStore.storeFile과 fileSotre.storeFiles의 반환값은 각각 UploadFile과 List<UploadFile> 객체를 반환하기 때문에 해당 UploadFile, List<UploadFile> 객체가 DTO 역할을 함으로서 Item 엔티티에 값을 전달하여 Item 엔티티는 Repository를 통해 DB 혹은 저장소에 첨부 파일의 originalName과 storeName을 저장한다.
@GetMapping("/items/{id}")
    public String items(@PathVariable Long id, Model model) {
        Item item = itemRepository.findById(id);
        model.addAttribute("item", item);
        return "item-view";
    }
2. /items/new 경로로 POST 요청이 가게되면, /item/{id} 경로로 리다이렉트 되게 된다.
- item-view.html
</div>
    상품명: <span th:text="${item.itemName}">상품명</span><br/>
    첨부파일: <a th:if="${item.attachFile}" th:href="|/attach/${item.id}|" th:text="${item.getAttachFile().getUploadFileName()}" /><br/>
    <img th:each="imageFile : ${item.imageFiles}" th:src="|/images/${imageFile.getStoreFileName()}|" width="300" height="300"/>
</div>
3. 저장소에서 id를 넘겨받아 해당 id에 해당하는 Item 객체를 저장소에서 찾아온다.
- 서버 경로에 있는 파일 데이터 가져오기
- ItemController.java
@ResponseBody
    @GetMapping("/images/{filename}")
    public Resource downloadImage(@PathVariable String filename) throws MalformedURLException {
        return new UrlResource("file:" + fileStore.getFullPath(filename));
    }
4. Resource 클래스를 이용하여 new UrlResource()메서드를 이용하여 파일 경로를 파라미터로 넘기면 해당 경로에 있는 파일을 찾아서 반환한다.
* 다운로드에 대해서는 추후에 추가로 작성해서 알아 볼 것이다......
- 파일 다운로드
- Item-view.html
</div>
상품명: <span th:text="${item.itemName}">상품명</span><br/>
첨부파일: <a th:if="${item.attachFile}" th:href="|/attach/${item.id}|" th:text="${item.getAttachFile().getUploadFileName()}" /><br/>
<img th:each="imageFile : ${item.imageFiles}" th:src="|/images/${imageFile.getStoreFileName()}|" width="300" height="300"/>
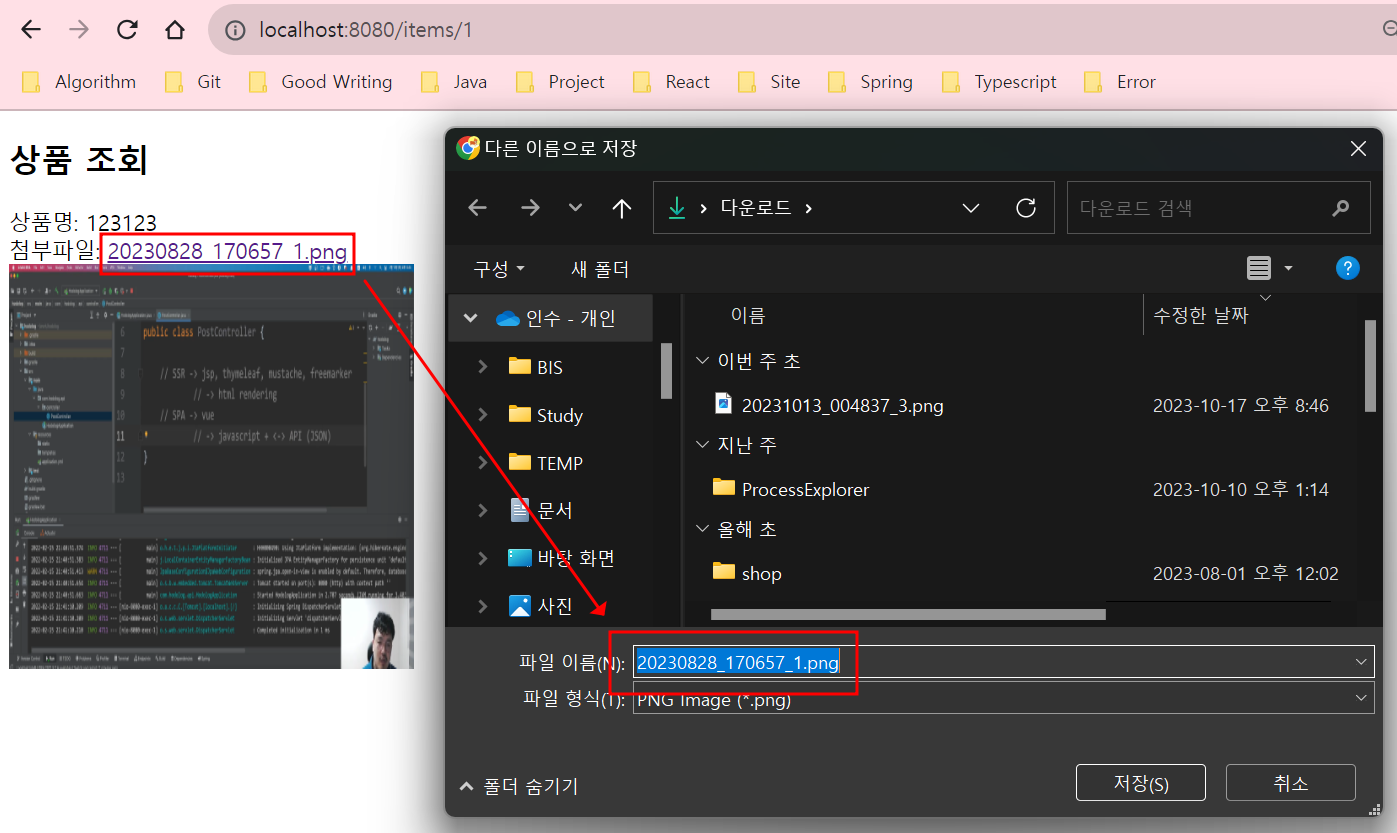
</div>1. HTML 코드를 보게 되면, 첨부파일 항목을 클릭하게 되면, /attach/{itemId} 경로로 요청을 보내게 된다.
- ItemController.java
@GetMapping("/attach/{itemId}")
    public ResponseEntity<Resource> downloadAttach(@PathVariable Long itemId) throws MalformedURLException {

        Item item = itemRepository.findById(itemId);
        String storeFileName = item.getAttachFile().getStoreFileName();
        String uploadFileName = item.getAttachFile().getUploadFileName();

        UrlResource resource = new UrlResource("file:" + fileStore.getFullPath(storeFileName));

        log.info("uploadFileName={}", uploadFileName);

        return ResponseEntity.ok()
                .body(resource);
    }
2. 기존에 아래 코드만 사용하게 되면, 파일을 다운로드 하는 것이 아닌 파일의 데이터만 가져오게 된다.
UrlResource resource = new UrlResource("file:" + fileStore.getFullPath(storeFileName));
3. 위와 같이 해당 파일을 클릭하게 되면 파일의 바이너리 데이터를 가져오게 된다.
@GetMapping("/attach/{itemId}")
    public ResponseEntity<Resource> downloadAttach(@PathVariable Long itemId) throws MalformedURLException {

        Item item = itemRepository.findById(itemId);
        String storeFileName = item.getAttachFile().getStoreFileName();
        String uploadFileName = item.getAttachFile().getUploadFileName();

        UrlResource resource = new UrlResource("file:" + fileStore.getFullPath(storeFileName));

        log.info("uploadFileName={}", uploadFileName);

        String encodedUploadFileName = UriUtils.encode(uploadFileName, StandardCharsets.UTF_8);

        String contentDisposition = "attachment; filename=\"" + encodedUploadFileName + "\"";

        return ResponseEntity.ok()
                .header(HttpHeaders.CONTENT_DISPOSITION, contentDisposition)
                .body(resource);
    }
String encodedUploadFileName = UriUtils.encode(uploadFileName, StandardCharsets.UTF_8);4. 위 코드는 주어진 문자열을 URI-safe 형식으로 인코딩하는 Java 코드이다. 이 코드는 UriUtils 클래스를 사용하여 문자열을 안전하게 URI 인코딩을 한다.
String contentDisposition = "attachment; filename=\"" + encodedUploadFileName + "\"";

        return ResponseEntity.ok()
                .header(HttpHeaders.CONTENT_DISPOSITION, contentDisposition)
                .body(resource);
    }
5. 추가된 위 코드는 응답 헤더에 CONTENT_DISPOSITION을 이용하여 파일을 다운로드 할 수 있도록 한다.
* CONTENT_DISPOSITION
1. Content-Disposition 헤더를 응답에 포함시키면 브라우저에게 다운로드 파일로 처리하도록 지시한다.
2. Content-Disposition 헤더 자체만으로는 파일 다운로드가 자동으로 발생하지 않는다.
Content-Disposition: attachment; filename="example.txt"3. 위 코드와 같이 헤더에 attachment; filename=과 같이 헤더에 내용이 포함되어야 한다. 위 내용이 포함되면, 해당 응답을 다운로드 처리하고, filename에 지정된 이름으로 파일을 다운로드 한다.
'개발 > Spring, Spring Data JPA, Querydsl' 카테고리의 다른 글
| Spring Test Code 관련 - (MockMvc 등... 여러가지) (0) | 2023.11.19 |
|---|---|
| Spring - 페이징, Querydsl RE (0) | 2023.11.14 |
| JPA - 기본 동작 방식, 아키텍처 (0) | 2023.08.01 |
| Spring - RequestBodyJsonController (0) | 2023.06.16 |
| Spring - Data JPA (0) | 2023.06.07 |