문자열
문자열 관련 주요 속성 및 메서드
| 속성 및 메서드 | 설명 |
| Length | 문자열의 길이값 반환 |
| ToUpper(0 | 문자열을 모두 대문자로 변환 |
| ToLower() | 문자열을 모두 소문자로 변환 |
| Trim() | 문자열의 양쪽 공백 잘라냄 |
| Replace(원본문자열, 대상문자열) | 원본문자열을 대상문자열로 변경 |
| Substring(문자열인덱스, 길이) | 지정된 문자열 인덱스부터 길이만큼 반환 |
String 클래스
Length
Length 속성을 사용하여 문자열의 길이를 구할 수 있다.
Concat()
Concat() 메서드로 문자열을 연결할 수 있다.
> string s1 = "백" + "인수.";
> string s2 = String.Concat("백", "인수.");
> $"{s1} {s2}"
"백인수. 백인수."
ToCharArray()
ToCharArray() 메서드로 문자열을 문자 배열로 변환할 수 있다.
> //[?] ToCharArray() 메서드로 문자열을 문자 배열로 변환하기
> string s = "Hello.";
>
> char[] ch = s.ToCharArray(); // 문자열을 문자 배열로 변환
> ch
char[6] { 'H', 'e', 'l', 'l', 'o', '.' }
> for (int i = 0; i < ch.Length; i++)
. {
.     Console.Write($"{ch[i]}\t");
. }
H	e	l	l	o
Split()
Split() 메서드를 이용하여 구분자를 사용하여 문자열을 분리할 수 있다.
> string src = "Red,Green,Blue";
>
> // 문자열에서 특정 구분자를 사용하여 문자열 배열 만들기
> string[] colors = src.Split(',');
> colors
string[3] { "Red", "Green", "Blue" }
문자열의 null값 및 빈 값 체크
문자열 변수는 ""와 같이 빈 값이 들어오거나 null값이 들어올 수 있다. String.IsNullOrEmpty() 메서드로 문자열 변수를 묶어주면 null 또는 빈 값 여부를 알 수 있다.
예외 처리
오류(에러)의 종류는 문법(컴파일) 오류, 런타임(실행) 오류, 논리(알고리즘)오류 등으로 분류된다.
문법 오류 : 컴파일 오류로도 불리며 대부분 C# 컴파일러가 잡아준다.
런타임 오류 : 컴파일 과정에서는 발생하지 않고 실행시에 발생한다.
알고리즘 오류 : 처리 결과가 틀리게 나오는 경우에 해당한다.
try ~ catch ~ finally 구문
try
{
    // 예외가 발생할 만한 코드를 작성
}
catch
{
    // 예외가 발생할 때 처리해야 할 코드 블록
}
finally
{
    // 예외가 발생하거나 정상일 때 모두 처리해야 할 코드 블록
}
Exception 예외 사용하기
using System;
using System.Collections.Generic;
using System.Linq;
using System.Text;
using System.Threading.Tasks;

namespace exceptionPrac
{
    class Program
    {
        static void Main(string[] args)
        {
            try
            {
                int[] arr = new int[2];
                arr[100] = 1234;
            }
            catch(Exception e)
            {
                Console.WriteLine($"{e.Message} 에러가 발생했습니다.");
            }
        }
    }
}
try를 통해 발생한 예외를 catch로 잡을 때 Exception 클래스를 이용해서 예외에 대한 객체를 받아올 수 있다.
e.Message를 통해 예외에 대한 message를 확인 가능하다.
FormatException 예외 처리하기
using System;
using static System.Console;
class FormatExceptionDemo
{
static void Main()
{
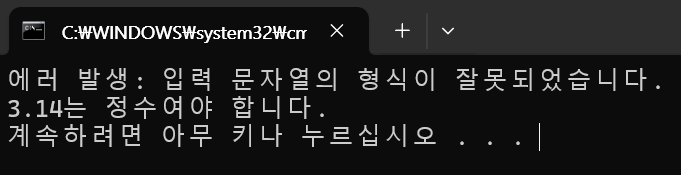
string inputNumber = "3.14";
int number = 0;
try
{
number = Convert.ToInt32(inputNumber);
WriteLine($"입력한 값: {number}");
}
catch (FormatException fe)
{
WriteLine($"에러 발생: {fe.Message}");
WriteLine($"{inputNumber}는 정수여야 합니다.");
}
}
}
간헐적으로 발생되는 예외 처리하기
using System;
using System.Collections.Generic;
using System.Linq;
using System.Text;
using System.Threading.Tasks;
using System.Threading;
namespace exceptionPrac
{
class Program
{
static void Main(string[] args)
{
while (true) {
try
{
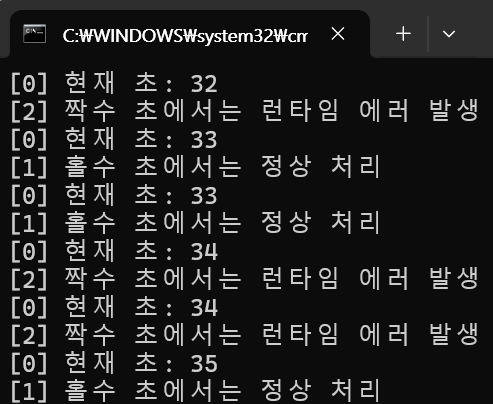
int now = DateTime.Now.Second;
Console.WriteLine($"[0] 현재 초: {now}");
//[!] 실행시간이 짝수이면 0으로 나누기에 에러가 발생
int result = 2 / (now % 2);
Console.WriteLine("[1] 홀수 초에서는 정상 처리");
}
catch
{
Console.WriteLine("[2] 짝수 초에서는 런타임 에러 발생");
}
Thread.Sleep(500);
}
}
}
}
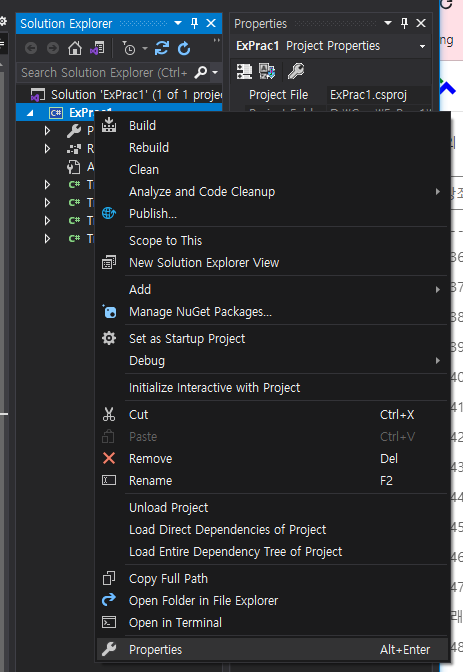
TryCatchFinallyDemo 콘솔 응용 프로그램 프로젝트 생성
Visual Studio를 사용하여 .NET Framework 기반으로 프로젝트를 생성하면 프로젝트에 여러 개의 Main() 메서드를 생성할 수 있다. 다만, 프로젝트 속성 창에서 반드시 시작 개체를 지정해야만 한다. 원칙적으로는 한 프로젝트에는 하나의 Main() 메서드만 있어야 하지만, Visual Studio에서는 이를 테스트할 수 있도록 클래스 이름을 다르게 만든 여러 Main() 메서드에서 시작 개체 하나를 선택할 수 있다.
1. 에러 안나는 코드
using System;
using System.Collections.Generic;
using System.Linq;
using System.Text;
using System.Threading.Tasks;

namespace ExPrac1
{
    class TryCatchFinallyDemo1
    {
        static void Main()
        {
            int x = 5;
            int y = 3;
            int r;

            r = x / y;

            Console.WriteLine($"{x} / {y} = {r}");
        }

    }
}
2. 무조건 에러 발생시키기
using System;
using System.Collections.Generic;
using System.Linq;
using System.Text;
using System.Threading.Tasks;

namespace ExPrac1
{
    class TryCatchFinallyDemo2
    {
        static void Main()
        {
            int x = 5;
            int y = 0;
            int r;

            r = x / y;

            Console.WriteLine($"{x} / {y} = {r}");
        }
    }
}
3. try ~ catch ~ finally 구문으로 예외 처리하기
using System;
using System.Collections.Generic;
using System.Linq;
using System.Text;
using System.Threading.Tasks;

namespace ExPrac1
{
    class TryCatchFinallyDemo3
    {
        static void Main()
        {
            int x = 5;
            int y = 0;
            int r;

            try // 예외가 발생할만한 구문이 들어오는 곳
            {
                r = x / y; // 0으로 나누기 시도
                Console.WriteLine($"{x} / {y} = {r}");
            }
            catch // try 절에서 예외가 발생하면 실행
            {
                Console.WriteLine("예외가 발생했습니다.");
            }
            finally // 예외가 발생하던 안하던 실행
            {
                Console.WriteLine("프로그램을 종료합니다.");
            }
        }
    }
}
4. Exception 클래스로 예외 정보 얻기
using System;
using System.Collections.Generic;
using System.Linq;
using System.Text;
using System.Threading.Tasks;

namespace ExPrac1
{
    class TryCatchFinallyDemo4
    {
        static void Main()
        {
            int x = 5;
            int y = 0;
            int r;

            try // 예외가 발생할만한 구문이 들어오는 곳
            {
                r = x / y; // 0으로 나누기 시도
                Console.WriteLine($"{x} / {y} = {r}");
            }
            catch (Exception ex)
            {
                Console.WriteLine($"예외 발생: {ex.Message}");
            }
            finally // 예외가 발생하던 안하던 실행
            {
                Console.WriteLine("프로그램을 종료합니다.");
            }
        }
    }
}
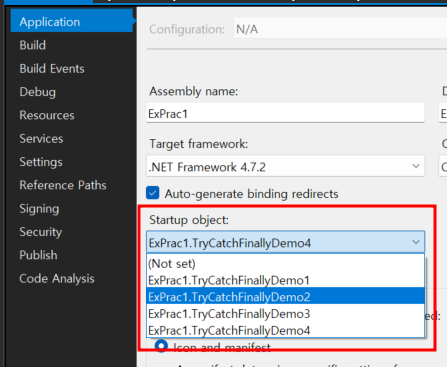
위 설정을 통해 실행할 Main() 메서드를 설정할 수 있다.
throw 구문으로 직접 예외 발생 시키기
throw는 인위적으로 예외(에러)를 발생시킴을 말한다.
try ~ catch ~ finally 절과 함께 예외 처리시 throw 구문을 사용할 수 있는데 throw는 무조건 특정 예외를 발생시킨다. throw 키워드 뒤에 특정 예외 관련 클래스(Exception, ArgumentException, ...)의 인스턴스를 넘겨주면 해당 예외를 직접 발생시킨다.
using System;
using System.Collections.Generic;
using System.Linq;
using System.Text;
using System.Threading.Tasks;
namespace throwEx
{
class Program
{
static void Main()
{
int a = 3;
int b = 0;
try
{
//[1] b가 0이므로 런타임 에러 발생
a = a / b;
}
catch (Exception ex)
{
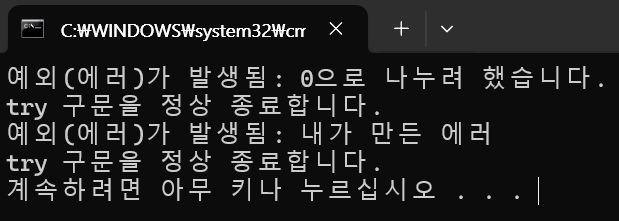
Console.WriteLine($"예외(에러)가 발생됨: {ex.Message}");
}
finally
{
Console.WriteLine("try 구문을 정상 종료합니다.");
}
try
{
//[2] Exception 클래스에 에러 메시지 지정하여 무조건 에러 발생
throw new Exception("내가 만든 에러");
}
catch (Exception e)
{
Console.WriteLine($"예외(에러)가 발생됨: {e.Message}");
}
finally
{
Console.WriteLine("try 구문을 정상 종료합니다.");
}
}
}
}
예외처리 Ex
이전에 작성한 로또 예제
public static void selectNum()
{
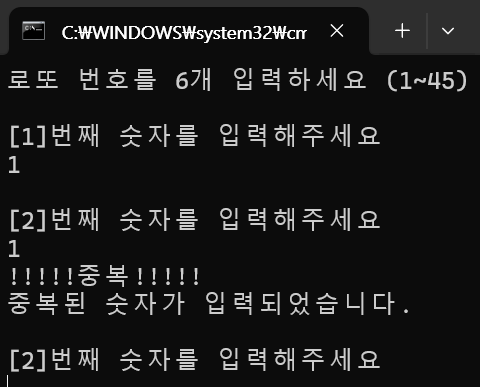
Console.WriteLine("로또 번호를 6개 입력하세요 (1~45)");
for (int i = 0; i < 6; i++)
{
Console.WriteLine($"\n[{i+1}]번째 숫자를 입력해주세요");
int num = Convert.ToInt32(Console.ReadLine());
if(num < 46 && num > 0)
{
for (int j = 0; j < 6; j++)
{
if(selNum[j] == num)
{
Console.WriteLine("!!!!!중복!!!!!\n중복된 숫자가 입력되었습니다.");
i--;
}
}
selNum[i] = num;
}
else
{
Console.WriteLine("!!!!!1~45 사이의 숫자를 입력해주세요!!!!!");
i--;
}
}
}
if(selNum[j] == num)
        {
            Console.WriteLine("!!!!!중복!!!!!\n중복된 숫자가 입력되었습니다.");
            i--;
        }
if문을 사용하여, 입력값에 예외가 발생하면 중복이 발생했다는 구문을 출력하였다.
아래 코드의 경우
public static void selectNum()
        {
            Console.WriteLine("로또 번호를 6개 입력하세요 (1~45)");
            for (int i = 0; i < 6; i++)
            {

                Console.WriteLine($"\n[{i + 1}]번째 숫자를 입력해주세요");
                int num = Convert.ToInt32(Console.ReadLine());
                if (num < 46 && num > 0)
                {
                    try
                    {
                        for (int j = 0; j < 6; j++)
                        {
                            if (selNum[j] == num)
                            {
                                i--;
                                throw new Exception("예외가 발생했습니다. !!!!!!! 중복된 숫자를 입력했습니다.");
                            }
                        }
                    } catch(Exception e)
                    {
                        Console.WriteLine($"{e.Message}");
                    }
                    selNum[i] = num;
                }
                else
                {
                    Console.WriteLine("!!!!!1~45 사이의 숫자를 입력해주세요!!!!!");
                    i--;
                }
            }
        }
try ~ catch, throw를 사용하여 예외 입력이 들어왔을 때 예외처리를 하였다.
try
                    {
                        for (int j = 0; j < 6; j++)
                        {
                            if (selNum[j] == num)
                            {
                                i--;
                                throw new Exception("예외가 발생했습니다. !!!!!!! 중복된 숫자를 입력했습니다.");
                            }
                        }
                    } catch(Exception e)
                    {
                        Console.WriteLine($"{e.Message}");
                    }
위 lotto 예시의 경우 try ~ catch, throw 바꿔서 사용하는 것은 비효율적이다. 예외처리를 연습하기 위한 코드이기 때문에 위 상황에서는 좋은 코드라고 볼 수 없다는 것은 알고 있어야 한다.
'Embedded > C, C#, Python' 카테고리의 다른 글
| C - 포인터 (0) | 2024.05.13 |
|---|---|
| C# 컬렉션, 제네릭, 널(null), LINQ (0) | 2024.04.29 |
| C# - 코딩 연습 / 1. Lotto 제작 / 2. 가위바위보 게임 (0) | 2024.04.22 |
| C - 헷갈리는 개념 정리 (0) | 2024.04.17 |
| C# - 클래스 (1) | 2024.04.15 |